Monday, July 16, 2012

Pictures #3

Sunday we started off at DeWeese Lake but didn't catch anything and got annoyed by some disrespectful jet skiers.

DeWeese Lake

Next we moved to the Arkansas River. River fishing frustrates me and these annoying birds kept laughing at me!

Birds Laughing at Me
This is a bridge that will lead to some new ATV trails once the weather cools off a little more.

My husband fishing the river.


Some rafters. The guide said he had been talking to other people fishing the river and nobody was doing good.

These rocks became a good place to sit and fish. I found that if I sat on the rocks, I didn't get tangled up as much. I still didn't catch anything, but I think it was my most successful river fishing trip because I didn't lose any lures, I didn't almost lose a fishing rod and my husband didn't have to cut any tree limbs to get me untangled.


Friday, July 13, 2012

Bug Off!!

I can't stand bugs. I'm not afraid of them, I'm just easily annoyed by them. If there are a bunch of of annoying gnats flying around my head, I will be miserable and have a crappy day. Because of this, I have tried many ways of bug defense. At home we have a giant bug zapper and I feed my hummingbirds very well so they will have energy to hunt and eat a lot of bugs at night. Taking a large bug zapper and a bunch of hummingbird feeders on a fishing, camping or boating trip isn't very practical though so we have found some other options.
Our most favorite for of bug defense is a ThermaCELL. (No they did not pay me to say this or give me a free one to try out.) I was a little sceptical at first when my husband suggested we try a ThermaCell, but Bass Pro had them on sale so we went ahead and bought one. I wish we had bought one years ago! If this one dies......well, I don't want to think about that.


We bought the carrying case which is very handy. (I thought I took a picture of it out of it's case, but I guess not.) The carrying case will hold the spare fuel and scent pads keeping them organized and close by.


The back of the case has an opening for the fan's intake and a clip you can clip to your belt, chair, tackle bag, boat seat, day bag and lots more.


I love that you can use it almost anywhere! It's designed to work when you're sitting in one place but we use it on the boat all of the time and it works great there, too. Two of our favorite fishing spots have the most annoying bug problems certain times of the year so we ALWAYS take the ThermaCELL when we go to those spots.

My next favorite are those weird looking bug bracelets. We originally bought them for our nieces and nephew to try out but now they are always in my day bag. They work really well and if you only use them for a little while, you can put them in a plastic baggie and reuse them later (a day or 2 later, not weeks later). I found out that if the bugs are messing with the back of your neck, put the bracelet around your ponytail! My nephew kept the bugs away from his face by putting a bracelet around the brim of his hat. The kids love wearing them so much that sometimes we find them still wearing the bracelets when they get out of bed in the morning. The bracelets are not oily so they don't leave a residue on your skin, in your hair or on your clothes (or bedding).


 Of course OFF! is always a favorite but I really like the towelettes because they fit in my day bag easier and they're good for faces (I HATE getting OFF! on my lips!). I really like the orange spray cans of OFF!, too. They don't stink like most OFF! and they are "Sweat Resistant" which means when you start sweating while you're fishing, it won't come off and run into your eyes! (It does come off in the shower though.)


 If you forget your bug defense or one mosquitto gets through your defense somehow, I suggest Avon's new Anti-Itch Spray. It works really good and fits in a day bag, first aid kit, medicine cabinet and most purses.


That's how I keep the bugs away from me and take care of the bites that got through my defense system (which doesn't happen very often.) Hope you have a bug free weekend!

Wednesday, July 11, 2012

Wormy Wednesday - Bad News

I have some bad news. On 4th of July, I took the worm farm out to the garage so our guests wouldn't have to look at a worm farm while they ate. When I brought it back in...............well, I'm not going to give you details on the smell and what I saw. It was a reminder how important monitoring temperature is.


I emailed Frabill for some desperate help and was very happy to get a reply back really quick from Terri in Customer Service. Terri sent me some more information that I will be sharing once we get restarted. Check in next week for Wormy Wednesday - Take #2!
Thank you Terri from Frabill for your help!

Sunday, July 8, 2012

Campfire Fajitas

I try to bring different kinds of food camping so we don't get tired of sandwiches, hot dogs and hamburgers. Before I plan on taking a new recipe with us on a camping trip I always experiment with it at home so I know exactly what I am doing at camp and so I can get the ingredients just right. This is a recipe I found online (I wish I remember where so I could give them credit). I will give you the original recipe and then give you the modifications I will be making to it at the end. I always try a recipe how it is originally written and then experiment with it a couple times before it gets written on a recipe card and put in my recipe box to make over and over and over. With this recipe you do part of it at home and then do the rest at camp. The prep work and beginning of the marinating is done at home which means I spend less time stuck in the motor home at camp doing prep work (that's my favorite part!).

Campfire Fajitas

This is what the finished fajita will look like
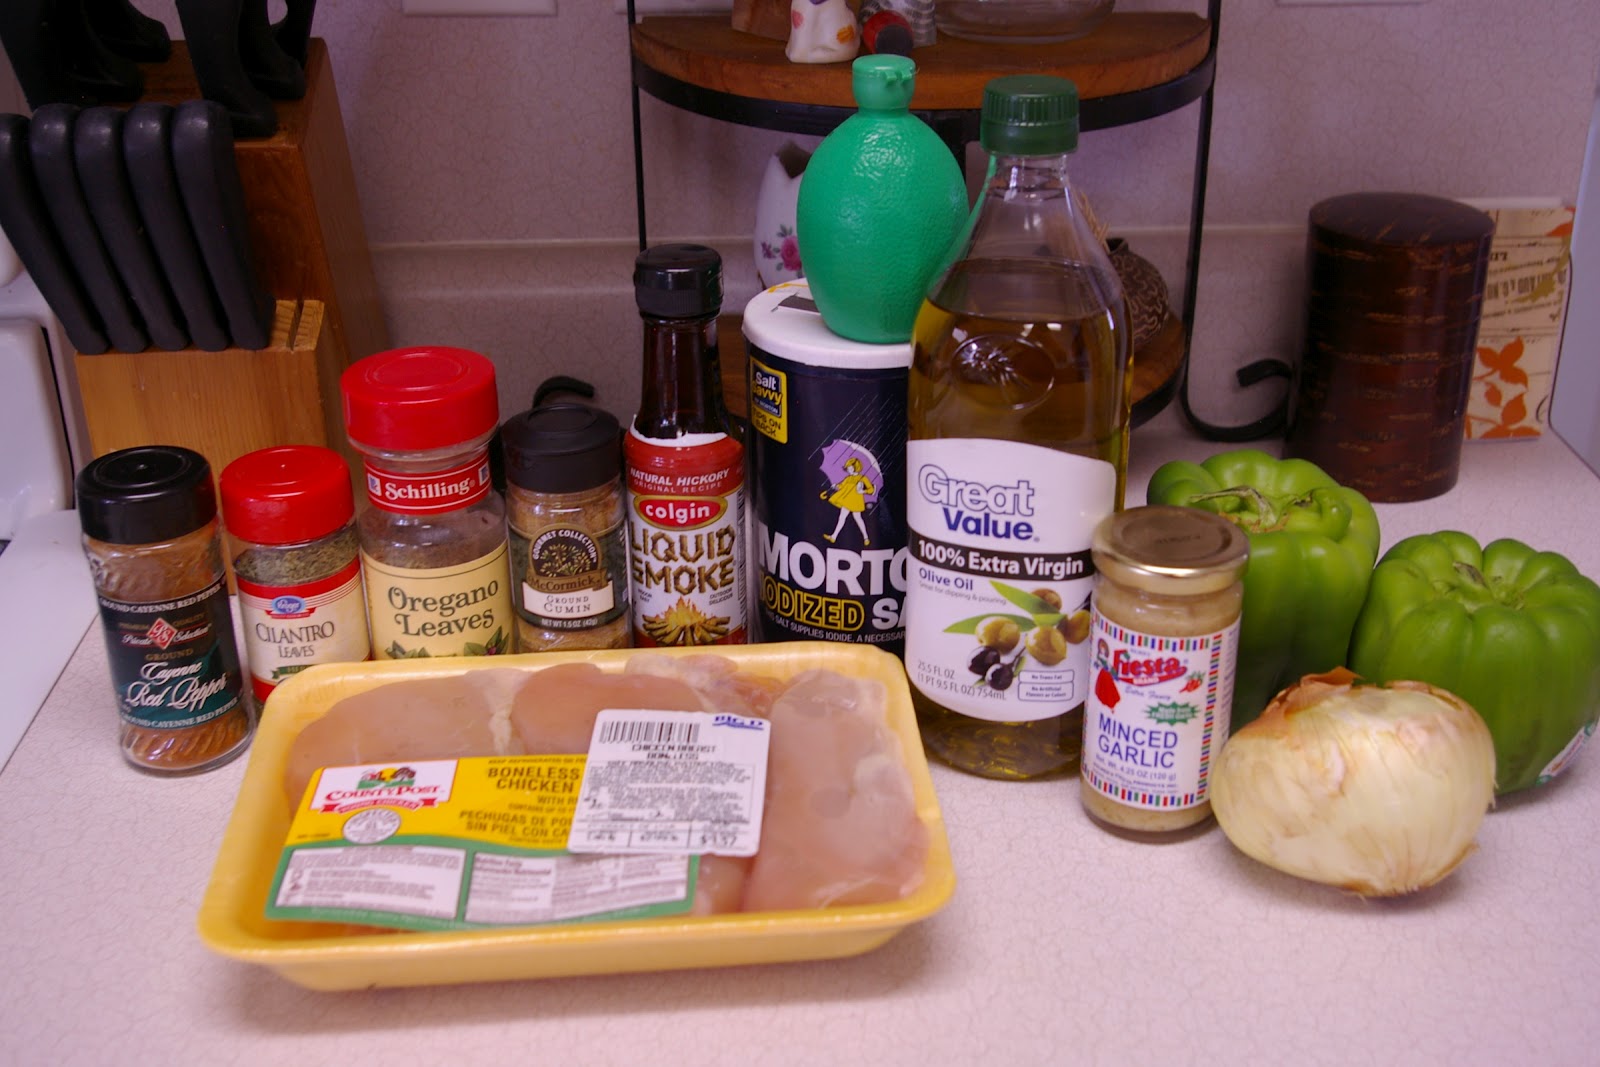
First step is to gather all of the ingredients:


The Ingredients

 1 pound boneless, skinless chicken breasts (partially frozen is good because it's easier to cut into strips)
2 bell peppers (2 green or 1 red, 1 green)
1 medium yellow onion
5 garlic cloves, minced (you'll notice I use a jarred minced garlic because it's hard to find good garlic where I live - 1 teaspoon = 1 clove of garlic)
1/2 cup olive oil
1 teaspoon salt
1/2 teaspoon cayenne pepper
1 tablespoon dried cilantro
1 tablespoon dried oregano
1 teaspoon ground cumin
2 tablespoons liquid smoke
juice from 1 lime (I couldn't find any good limes so I used a couple squirts from one of those plastic limes)
2 tablespoons butter
fajita tortillas and any extras you want like cheese and sour cream

At Home:

Slice the chicken in 2 to 3 inch strips (big enough they won't fall through a grill grate) and place the strips in a large zipper bag. Add the olive oil, salt, cayenne pepper, dried cilantro, dried oregano, cumin, liquid smoke and lime juice and place the bag in the refrigerator.
The Chicken Step Completed
De-seed and core the peppers, slice into strips. Slice the onion into strips and mix with the peppers. Store the onions and peppers in an air-tight container and also place in the refrigerator.
The Vegetable Step Completed

 At Camp:

For this part you have to imagine you are at camp. I have the same pans in the motor home as I do my house so that helps with the imagination. I cut my chicken into too small of pieces so I had to use a frying pan instead of grilling on the BBQ or fire grate (it was also really windy outside so the BBQ wouldn't have been very fun). I waited 3 days to do this step because I figured that would be the timeline when I would make it at camp (Day 1 prepare and pack, Day 2 leave for camp and eat on the road or quick sandwich after while we're setting up camp, Day 3 you're set up and ready to make a dinner like this.)
Take out your chicken, pepper and onion mixture and the 2 tablespoons of butter.
 At home I use an electric stove but in the motor home we have gas. I turn the heat up on my electric stove to simulate the hotter heat of the gas motor home stove.

 On a hot fire grate or BBQ grill grate (or frying pan), cook chicken. While the chicken is cooking, melt the butter in a large skillet and saute vegetables over medium heat until the onions are translucent.

 Combine everything into a tortilla, add cheese, sour cream if you want and enjoy!
Campfire Fajita not made on a campfire
These were really good except I burned the chicken a little and the oregano and cilantro overpowered the flavor a little. Next time I am going to cut back to 1/2 tablespoon of dried oregano and 1/2 tablespoon of dried cilantro. I also won't take pictures so I can keep a better eye on the cooking instead of worrying about getting a good picture and keeping my camera out of the way. I think the grill taste would have made it even better so next time I will definitely use the grill.
Try this recipe and post your modifications in the comment section so I can share with everybody!
If you have a recipe to share, please email it to me so I can experiment and share.

Sunday, July 1, 2012

Have you ever wondered what the inside of your RV door looks like?

If you've ever wondered what the inside of your RV door looks like, then you are going to love this post. We (mostly my husband) took the door off and redesigned the inside for more support. This isn't something we just decided to do for fun, the door has been giving us trouble for awhile. The last few trips I was worried it was going to fly open. The door was also a pain to get latched, especially from the inside.
The first step was to take the door off the hinge. (It was hard to take pictures and hold the door so there aren't any pictures of that step.)
It looks funny without the door on.
 The next step was to take the door skins off. I was really surprised to see what type of insulation and support the door had! Here is a picture of the "insulation/support." You could tell the window had leaked and started breaking down the insulation/support.
Insulation/Support
 The next step was to inspect the "frame." No wonder it flapped around so much!! I know the motorhome is around 30 years old, but this is a very sad frame.
The "Frame"
 The door had flapped around so much that the outside skin and broke around near the latch area.
Broken Skin
 Next, we (my husband) layed out the new frame over the old frame and then designed a new support system for the bottom of the door. Looks pretty strong, doesn't it?
New Frame
 The next picture shows how the old frame looks without the skin holding it together. This picture made me start thinking about the wall construction in the rest of the motor home.
Old Frame
 It is important to ask for help once in awhile and the bunnies in our neighborhood are there to help....and to drive the dogs crazy.


 Now it's time to test the new frame on the skins to check for the fit. Looks good so far.

New Frame On A Skin
 We didn't want anymore issues with the latch area ever again so my husband reinforced the latch area with some metal.
Latch Reinforcement
 Next my husband wanted to make sure we weren't losing the inside warmth through the door and the outside heat was coming in through the door so he added some extra insulation.
An Extra Layer of Insulation
We bought some Thermotec Heat and Sound Insulation to line the inside of the doghouse (aka: engine cover) to help keep the heat away from our legs and from heating up the cab area too much while we were driving down the road. It worked well on the doghouse so we are confident it will work on the door.
The First Layer Of Insulation
 Next we (he) added some of the same honeycomb cardboard stuff that was originally in the door. He added some heat tape around the edges to make sure if there is anymore water that tries to leak inside, it won't leak through the cardboard again.


 Of course we added some artwork to the inside in case anybody ever tears the door apart again.
Our Artwork - I did the bottom panel.
 He put the skins back on, put the window back in and added the rest of the hardware.

Hardware Not Shown In This Picture
 The door was then put back on the motorhome and tested over and over and over and over and over. It was amazing! You can now shut the door from inside the motorhome on the first try and you don't have to hold the handle (or your tongue) in just the right way for it to close. It's great! The screen door also now opens with the outside door! My dogs' noses are really going to appreciate that!
The End
Now you don't have to tear apart your RV door to see what's on the inside and now I don't have to cuss at my RV door when I open or close it!!

Wednesday, June 27, 2012

Wormy Wednesday - The Habitat

For this Wormy Wednesday I want to talk about the worm habitat - because that seems like a good place to start! The first time I started a worm farm, my husband help me set up a really cool plastic tote with wheels and air and drainage holes. Some day I hope to get that tote back out, but for now I'm staying small.

I use the worm bedding made by Frabil because it's easy and because it's perfect. If you don't want to pay for bedding you can use newspaper (black & white only, no colored ink) that is shredded and moistened (not wet). You can also add some garden soil or top soil. The grit in the soil is good for the worms' diegestion. DO NOT use potting soil. Potting soil has chemicals that are good for plants but really bad for worms. Shredded computer paper also works, but no color ink on the paper and no colored paper. The bedding only needs changed about every 6 to 9 months depending on how many castings (aka: worm poop - that's a later post) you have so my 2 pound bag of Frabil worm bedding will last me at least a year.

A Happy Worm Enjoying The Bedding I Set Up For It
You need to keep an eye on the temperature not only of the area the worm farm is set up in, but also in the middle of the bedding. Currently my worm farm is in my kitchen, but eventually it will be back out in my insulated garage. Some people like to keep their worm farms in their basements or laundry rooms. Where ever you keep your worm farm, you need to keep an eye on the temperature of the room your farm is in. Checking the temperature of the middle of the bedding is also a good way to make sure your bedding stays loose. The worm farm should be between 45 and 85 degrees farenheit, 60 to 80 degrees is ideal. The worm farm should never be in the sunlight because heat can build up very fast and coud kill your worms, cause odors and help other weird stuff to grow in your bedding. A laser thermometer is a great way to take the temperature of your worm bedding.

A Perfect Temp For My Worms' Bedding
Worms need a moist bedding to help them breath, but too much water could drown your worms (still not ready to discuss my experience with that). It's a good idea to spray the top of the bedding once in awhile to help keep the bedding moist. NEVER pour water in, always use a spray bottle! Worms may live down deep in the bedding, but they still require oxygen so if your tote or Frabil Habitat has a lid (which is a good idea for nighcrawlers and any other earthworms), make sure there are small holes so the oxygen can get it but the worms can't get out. Turning the bedding once in awhile helps keep the bedding looseso the air can circulate easier.
Oxygen Holes
Nightcrawlers don't like light, so if you need to leave the top of your worm farm open, a street light outside a window or a nightlight will help keep your worms inside their habitat.
Unhappy worms will try to get out of their habitat, happy worms will want to hang out. Happy worms will also start laying eggs in a couple months! (Hope to have that post some time this fall!)

Wednesday, June 20, 2012

Wormy Wednesday - Some Facts

For this Wormy Wednesday I was having trouble narrowing down 1 topic to discuss so I thought I'd give some interesting facts about worm farming. I don't have any interesting updates on my worm farm since it's only the first week. All of my worms have gone down into the bedding so a picture would be really boring right now.

Here are som facts:
  • The technical name for worm farming is called Vermiculture. (I'm going to continue calling it Worm Farming on this blog - easier to spell.)
  • You can start the harvesting process after only 2 months after initial setup and then about once a month after that. (Busy little things!)
  • Each worm has the reproductive system of BOTH sexes, but you still have to have 2 worms for the reproduction to take place.
  • Worms move by stretching and pulling their strong muscles. (Which is why they can burrow into the dirt so easily and which is why they don't slither like a snake.)
  • Redworms are one of the easiest worms to farm and Earthworms are one of the hardest. (I never do things the easy way!)
  • Redworms are the best choice for compost piles because they consume large amounts of organic matter. They also live closer to the surface and reproduce very quickly.
  • There are over 1,800 species of Earthworms!
  • Worms can drown in soil! (I learned this one on my own.)
  • You can not feed worms meat, dairy, fatty foods, citrus, onion and garlic.
  • Worms like to eat: bread, fruit peels & cores (no citrus), vegetables, eggshells, hair, coffee & tea grounds and a LOT more.
Hope you learned some new fun facts on this Wormy Wednesday. If you have any fun facts about worms, let me know so I can share with everybody. Next week we'll discuss the worm habitat and maybe discuss some of the mistakes I made the first time I tried worm farming......unless I'm still too traumatized to discuss them.