It's finally here! The very first Wormy Wednesday! Prepare to learn more about worms than you ever wanted to know! :)
Okay, first let me explain my experience with worm farming. This will be my 3rd try. The first try I started off way too big and learned a lot. My second try really wasn't a try. We were using the worms from my worm farm for fishing so they never had a chance to multiply. This time I am starting small and the worms in the worm farm are NOT for fishing......yet. Since pictures of the worm farm are going to be kind of boring and there won't be much excitement these first few months, I will also give you lots of facts about worms and explain to you why I'm doing certain things (like starting small). If you have any questions, leave them in the comment section and I will answer them the next week.
I will admit, I did not do all of this today. Since there was so much prep work for this post, I put everything together this past Saturday so my worm farm has actually been going for 3 days already.
I started off with a Frabil Habitat II, Frabil worm bedding, Frabil worm food and 20 DMC night crawlers. I bought all of the Frabil supplies at Bass Pro Shop and the DMC worms at my local WalMart.
Next, I mixed the bedding with about 3 cups of water. Be sure to use a bucket that has a smooth bottom! I used an old cat litter bucket once that had some sharp pieces of plastic on the bottom and when I mixed the bedding & water, I kept catching my fingers on those pieces of plastic. The picture will still be kind of dry, but that is okay because you don't want it too wet.
The bedding mixture was finally ready for the Frabil Habitat II. When I change the bedding out, I will definitely use less bedding.
It's finally time for the worms! I put all 20 worms in without the dirt they came in. The dirt that is stuck to them is fine, no need to wash the worms before adding them to the bedding.
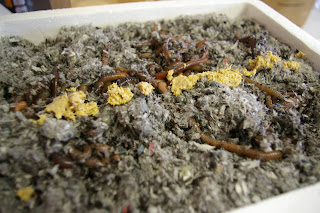
Because they just came out of the fridge, the worms will lay there for awhile until they start to warm up. The lid goes on and the waiting starts.Worms need oxygen so I have to make sure these air vents aren't blocked with bedding material on the inside and nothing gets set on top of the vents on the outside.
We'll discuss a worm's diet a little more later, but here is the Frabil worm food. It is a dry food that you have to add water to.
Last time I used the food I think I added too much water because I don't remember it being so paste-like. I'm going to read the instructions and measure more carefully for the next feeding and let you know.
Once the worms have woken up a little and started to move around and burrowing, the food can be added. The food goes in a line across the top of the bedding. You should always put the food in the same spot, not so that the worms know where to go to look for it. If you put the food in the same place each time, you'll know where to look for it every time when it's time to clean out the old food and add the new food.
Now that the setup is done, we'll start getting into more of the details of raising worms. Check back next Wednesday for some of those details! Thank you!


No comments:
Post a Comment